
Lead gen systems · Guide 01 of 07
Solar renders for installers
Two systems that find buildings with a bare roof, put a real solar array on that exact roof in a real photo, and send it to the person who owns it. Everything here works anywhere in the world and every prompt is written out in full.
17 min read8 steps5 promptsfree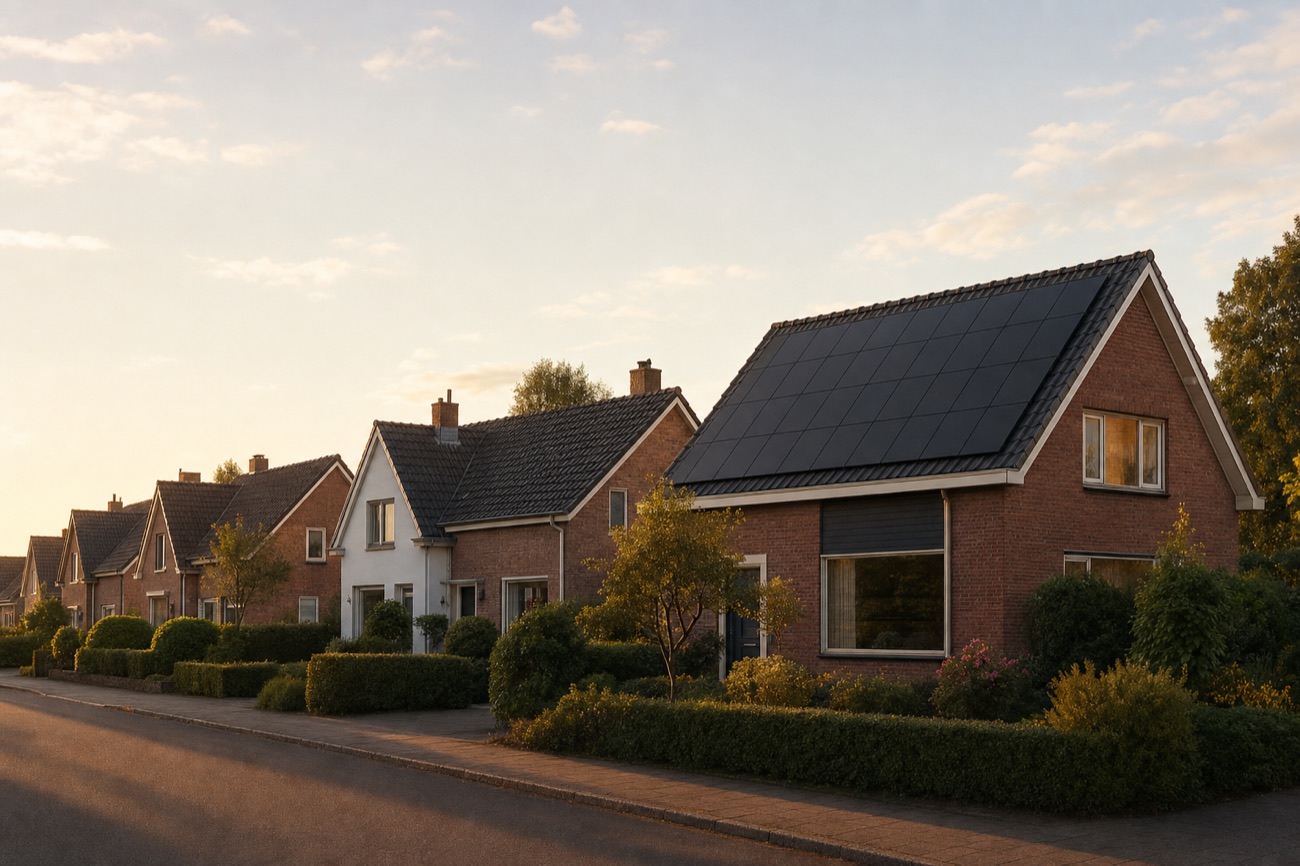
What this is, and how it works
You show a building owner a photograph of their own roof with solar panels already on it. That picture is the whole product.
This works because nobody ignores a picture of their own house. A solar leaflet gets binned because it is the same piece of paper as every other house on the street. A photo of their roof gets looked at, because it could only have been made for them.
You are not installing anything. You find the buildings, make the picture, send it, and sell the reply to a solar installer who does the work. That is the business.
Every system in this seven part series is the same eight steps. Learn them once here and the other six guides are the same shape with a different picture at the end.
The one rule that keeps you out of trouble: never put a number on the picture that you cannot point at a source for. This only works because the person believes it. The moment you invent a saving figure, or round a roof size up because it sounds better, you are doing what everyone else does and you will get the reply rate everyone else gets. If you do not have a number, leave it off.
The eight steps
- 1Find a list of buildings in one town.
- 2Qualify each roof, and throw away the bad ones.
- 3Capture the real photo of the good ones.
- 4Work out the three honest numbers.
- 5Render the panels onto that real photo.
- 6Put the picture and the numbers on one page.
- 7Look at it yourself and approve it.
- 8Send it.
You do not need to be a developer
Steps 1 to 4 are web addresses you paste into a browser. Step 5 is a prompt. Step 8 is an email. The only real skill is taste in step 7, deciding whether a picture looks believable, and you get that by looking at twenty of them.
Steps 1 to 6 are automatic, step 7 is you every time, step 8 is one email. Do it by hand for one building before you automate anything. You will understand the whole thing in an afternoon instead of spending a week building a machine for something you have never done once.
The pipeline, stage by stage
Left to right, one box per stage. The data source that feeds each stage sits underneath it.
- Stage 1FINDBuild the listPlaces APIsearchText
- Stage 2QUALIFYIs the roof worth itSolar APIbuildingInsightsno coverage?PVGIS + Overpass
- Stage 3CAPTUREGet the real photoStatic Maps +Street View
- Stage 4SIZE + MATHkWp, yield, paybacksolarPanelConfigsor PVGIS + tariff
- Stage 5RENDERPanels on the roofimage edit modelreal photo in
- Stage 6COMPOSEThe one page assetHTML templateto PNG and PDF
- Stage 7APPROVEYou look at ityour dashboardnothing sends itself
- Stage 8SENDIt does the sellingemail · WhatsApp· postcard
Every stage writes its result back to one row in the database. A stage that fails leaves the row where it was, so the next run picks it up again and carries on from there.
Stage 7 is a person, not a job. The send stage refuses to read a row that nobody approved.
What you need before you start
Five accounts. Two of them need a card. Do the Google one first, because everything waits on it and it takes the longest.
| Account | What it is for | Free tier | Card |
|---|---|---|---|
Google Cloud console.cloud.google.com | One project, one API key, and you switch on five APIs inside it. This single key does steps 1, 2 and 3. | 10,000 free calls a month per API. The one you use most, Solar buildingInsights, is in that band, so in practice you will not pay for the roof data. | Yes |
| Switch on exactly these five: Places API (New) · Solar API · Street View Static API · Maps Static API · Geocoding API | Then restrict the key to those five and nothing else, on the same screen. A leaked open key is your bill. | ||
An image model aistudio.google.com or replicate.com | Step 5, putting the panels on the roof. This is the only part with a real cost per building. | None for images. Google's model is gemini-3-pro-image, Replicate's is openai/gpt-image-2. The pictures in this guide were made with the Replicate one. | Yes |
Resend resend.com | Step 8, sending the email | 3,000 emails a month, 100 a day, on one domain you verify. Plenty. | No |
Supabase supabase.com | Somewhere to keep the buildings and the pictures. Skip this on day one and use a spreadsheet and a folder. | 500 MB database, 1 GB of files. Note a free project pauses after 7 days of nobody touching it. | No |
PVGIS re.jrc.ec.europa.eu | The backup for countries Google's Solar API does not cover. See the last page. | Completely free. No account, no key, nothing to sign up for. | No |
Do this before you write a line of code
- Make the Google Cloud project and switch on the five APIs.
- Make one API key and restrict it to those five APIs.
- Set a budget alert on the project. You will forget a loop is running at some point, and this is the difference between noticing today and noticing on the invoice.
- Paste your own home address into the Solar API call on the next page and check the answer looks right. That one test tells you the whole chain works.
What you can skip at the start
A dashboard, a database, a scheduler, a domain, a company. None of it is needed to send the first ten pictures.
A spreadsheet with one row per building, a folder of before and after images, and your normal email account will take you all the way to a paying client. Build the app when doing it by hand starts to hurt, and not before. Section 10 is there for when that day comes.
System 1.1Rooftop render for homes
A homeowner sees a photo of their own house with solar panels on it before anyone has knocked on their door.
What it does, and who pays you for it
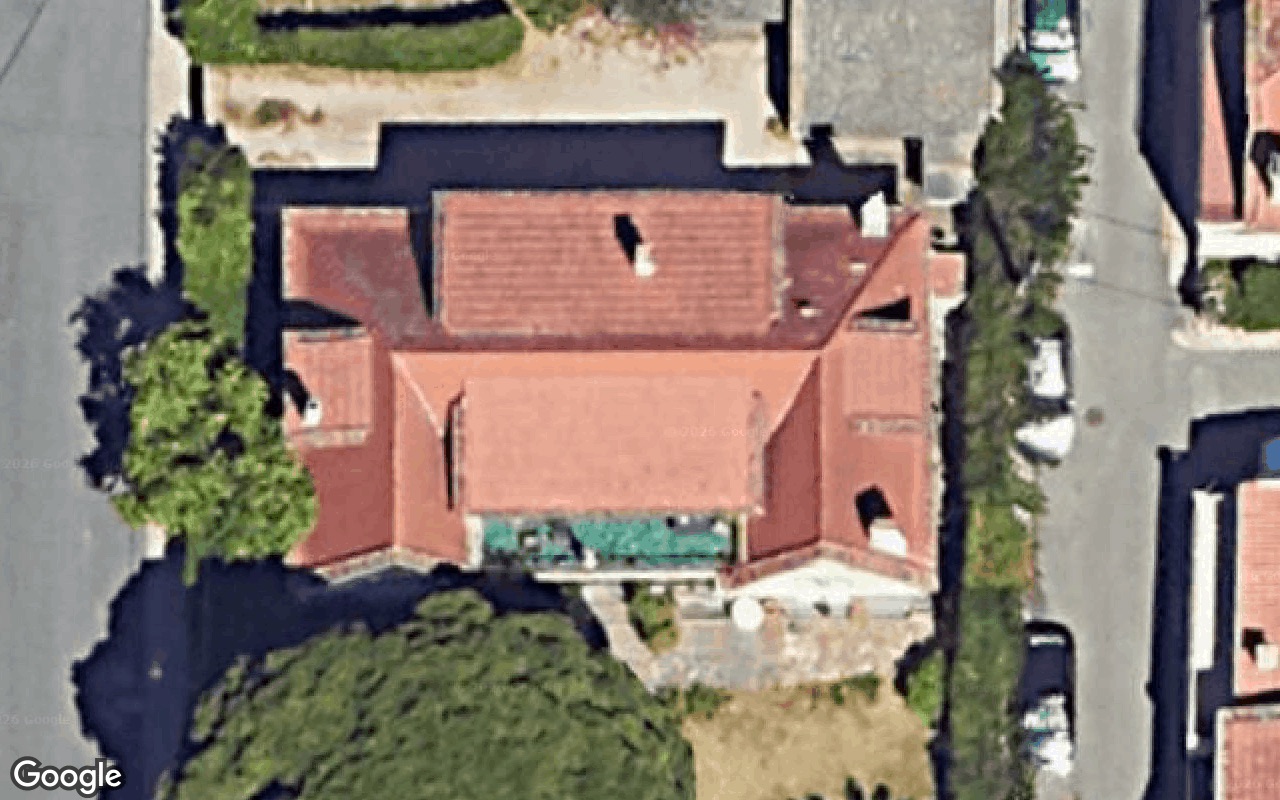
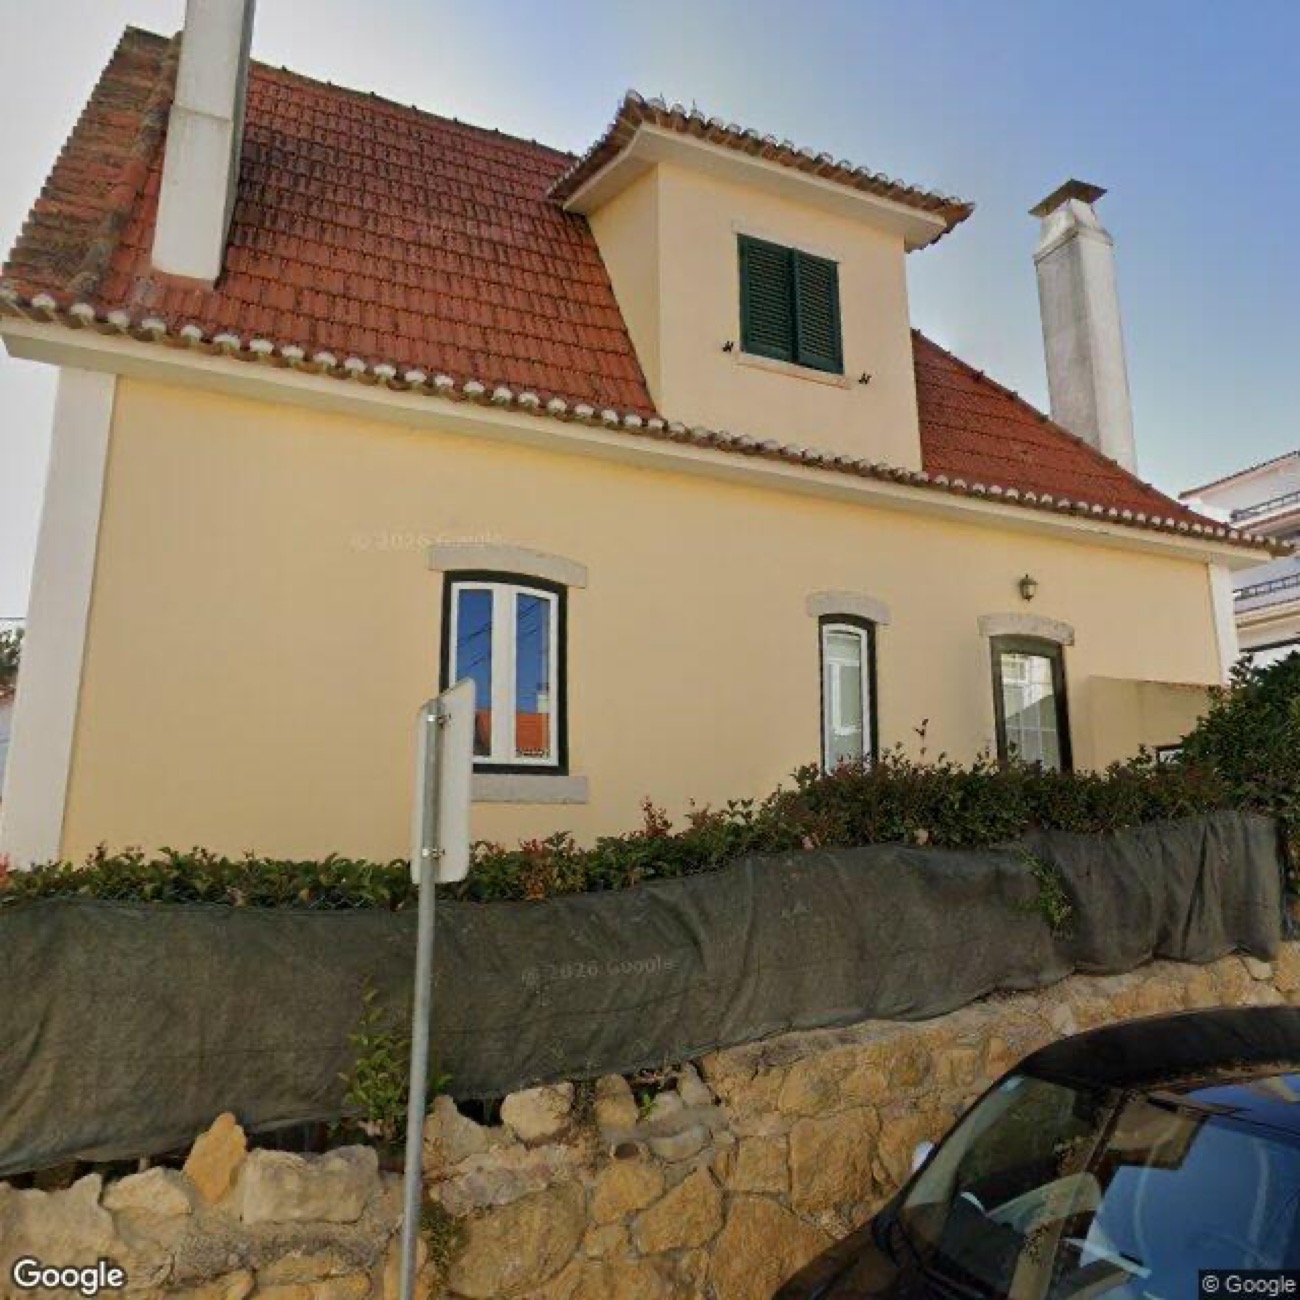
Who pays you. A solar installation company. Not a manufacturer, not a national brand. The small firm that turns up in a van and fits the panels. Two to about twenty people is the sweet spot: below that nobody answers the phone, above it they have a marketing person and you become a line item.
They pay because an installer with idle fitters loses money every day, and a lead that arrives with a picture converts faster than one that arrives as a name.
What they do instead today: buy shared leads from a comparison site, where the same homeowner is sold to four installers at once and only the fastest caller wins. They complain about it constantly, which makes it an easy conversation to start.
The beginner's version of this, and honestly the one to do first
Do not contact homeowners at the start. A house has no listed email address, so you would be stuck with physical post before you have proved anything.
Instead, run steps 1 to 6 on thirty houses in one installer's town and email the installer the thirty pictures. Installers are businesses, so they have an email address you can actually find. You are selling them a ready made campaign instead of hunting down thirty strangers. It is faster, it is easier, and it gets you a paying client sooner.
The pipeline, step by step
Every example below is one real house: Rua Dr. António Martins, Estoril, Portugal, at 38.7043566, -9.393056. The answers shown are the real answers. Paste them and you will get the same thing.
1Find the buildings
Pick one suburb, not a city. Get the addresses on a few streets and turn each into a latitude and longitude with the Geocoding API. A spreadsheet of thirty is plenty to start.
2Ask Google about the roof
One call per building. This is the important one and it is the whole system.
curl "https://solar.googleapis.com/v1\/buildingInsights:findClosest\?location.latitude=38.7043566\&location.longitude=-9.393056\&requiredQuality=HIGH\&key=YOUR_KEY"
What comes back for this house: a 240 m² roof, room for 61 panels, 1,853 hours of sun a year, and a list of every roof slope with the direction it faces. The best slope here faces 182°, which is almost dead south.
If you get a 404, that is not a bug. It means Google has no roof data for that country. Do not crash, use the PVGIS backup on the last page.
3Get the real photo
Two calls, and the first one is free and does not use any quota, so always do it first.
# is there a photo here at all?curl "https://maps.googleapis.com/maps/api\/streetview/metadata?location=38.7043566\,-9.393056&radius=60&key=YOUR_KEY"# if that said OK, get the picturecurl -o before.jpg "https://maps.googleapis\.com/maps/api/streetview?size=640x640\&location=38.7043566,-9.393056\&heading=293&pitch=12&fov=70&key=YOUR_KEY"
Heading is the compass direction the camera looks in. Get it wrong and you photograph the house opposite. Work it out from the camera position that the first call gives you to the building, or just try a few numbers by hand at the start. Pitch 12 tilts the camera up to see over hedges, which you will need on about one house in four.
4Work out the three numbers
The answer from step 2 has a list of options. Do not take the biggest one. 61 panels means covering the north facing slopes too, and the picture will look wrong to anyone who knows roofs. Take the one that fits on the best slope. For this house that is 24 panels.
The three numbers are:
| 24 panels | from the api's own list |
| 9.6 kWp | 24 × 400 watts ÷ 1000 |
| 16,255 kWh a year | the api's own figure |
Never turn kWh into money. You do not know their electricity tariff and you never will. State the production and let the installer talk about money. This also keeps you honest and out of trouble.
5Put the panels on the photo
Send the real photo and the prompt on the next page to an image model. That is the whole step.
If it comes back wrong, just run it again before changing anything. These models are random and a plain retry fixes a lot of bad ones.
6One page: picture on top, numbers underneath
Big picture, then the three numbers small, then one line saying where the measurement came from and that the layout is an illustration. That line is what makes it credible instead of spam, so do not shrink it to nothing.
7Look at it yourself
One question: would I believe this if it arrived about my house? At the start you will bin about one in four. That is normal and it is why this step is a person. The most likely way this whole thing goes wrong is you getting bored and approving without looking.
8Send it
Picture in the body of the email, four lines of text around it, and one easy question at the end. The prompt for that text is on the next page.
The picture, and what makes it work
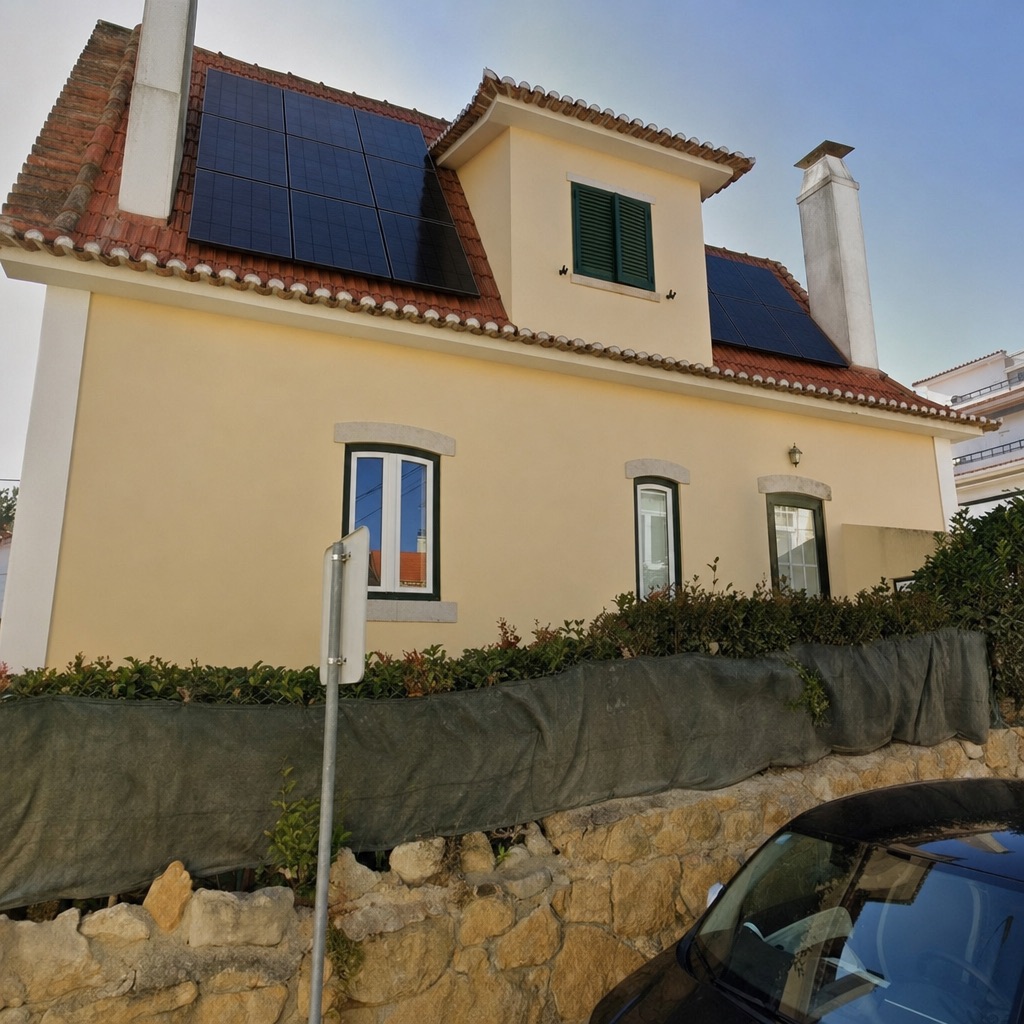
A real one, made exactly the way the last page describes. Rua Dr. António Martins, Estoril, Portugal. Real Street View photo, real Solar API numbers, real model output.
The same house, done badly
This is also real model output from the same photo. I asked for it deliberately, because every mistake a beginner makes is in this one picture, and once you have seen it you will spot all five in a second.
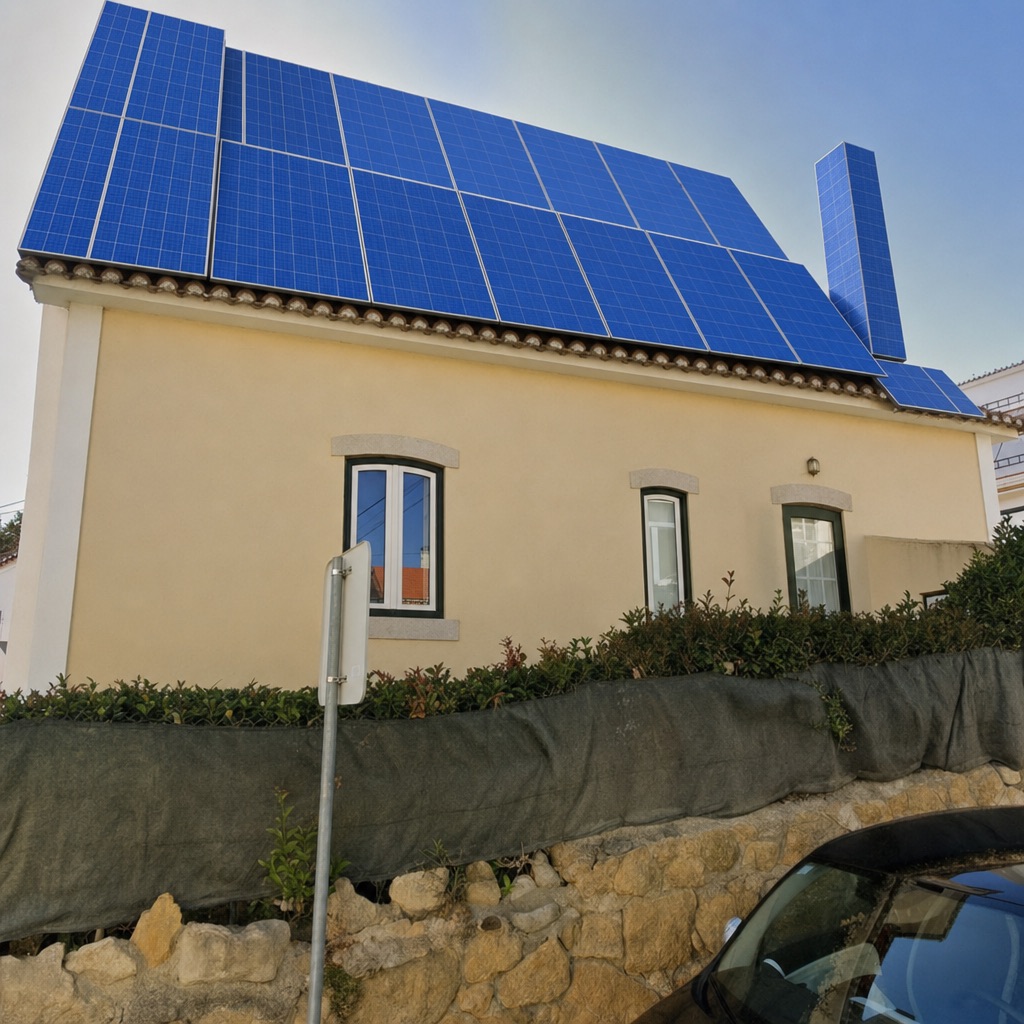
Five rules, and this picture breaks every one
- Always start from their real photo. Never generate a house from a description. The whole effect is them recognising their own gate.
- Match the light already in the picture. The most common giveaway. Check where the chimney shadow falls, then where the panel shadows fall. If they disagree, bin it and run it again.
- Leave a gap at the edges, and never cover a chimney. Real arrays stop short of the roof edge, because of wind rules and because fitters need somewhere to stand. Edge to edge is what installers spot first, and a chimney painted over is obviously fake to the person who lives there.
- The number in the picture and the number in the text must match. If the text says 24 panels and the picture clearly shows 40, you have lost them.
- Write "illustration, not a design" under it, and keep the before photo forever. The line costs you nothing, because they are already looking at their own roof by the time they read it.
What goes under the picture, word for word
24 panels · 9.6 kWp · roughly 16,255 kWh a year.roof measured by the Google Solar API from aerial imagery dated 16 December 2024. panel layout is an illustration, not an installation design.
The thing nobody tells you about these models
They do not paint onto your photo. They make a new photo that looks like yours. The house, the light and the framing survive, but small details do not always: do the same house from above and you will see a parked car quietly change shape. That is fine for what this does, and it is not fine if you ever call it a photograph. Say "your roof, with an array on it". Never say "a photo of your roof".
The prompts
Three prompts, complete, nothing to fill in except the {{double braces}}. These are the guide. Everything else you could work out, but these took a lot of failed pictures to get right.
Step 2Decide if the roof is worth it
Any cheap text model. Paste the API answer in at the bottom.
You are screening roofs for a solar sales picture. You will be given the raw JSON answer from the Google Solar API buildingInsights endpoint for one building. Decide whether this roof is worth making a picture for.Apply these rules in order and stop at the first one that fails:1. REJECT if solarPotential.maxArrayPanelsCount is less than 8. Reason: "too small to be worth an installer's time".2. REJECT if no entry in solarPotential.roofSegmentStats has stats.areaMeters2 of at least 20. Reason: "no single roof slope big enough for a tidy array".3. Find the BEST SLOPE: of the slopes with areaMeters2 of 20 or more, pick the one whose azimuthDegrees is closest to {{EQUATOR_AZIMUTH}}. ({{EQUATOR_AZIMUTH}} is 180 if the building is north of the equator, 0 if it is south of it.)4. REJECT if that best slope's azimuthDegrees is more than 90 degrees away from {{EQUATOR_AZIMUTH}}, measured the short way round the circle. Reason: "best roof slope faces away from the sun".5. REJECT if that best slope's pitchDegrees is below 5 or above 45. Reason: "roof angle outside the straightforward install range".6. REJECT if imageryDate is earlier than {{MIN_IMAGERY_YEAR}}. Reason: "photo too old to trust that the roof is still bare".If nothing rejects it, ACCEPT.Then choose how many panels to draw. From solarPotential.solarPanelConfigs, pick the LARGEST option whose panelsCount, multiplied by (panelHeightMeters * panelWidthMeters), is still no more than 80% of the best slope's areaMeters2. Never pick the biggest option in the list. If nothing qualifies, pick the smallest option.Return ONLY this JSON object and nothing else. No explanation, no code fences.{ "decision": "accept" | "reject", "reason": "one short lowercase sentence", "best_slope": { "pitch_degrees": number, "azimuth_degrees": number, "area_m2": number }, "chosen_panel_count": number, "system_kwp": number, "yearly_kwh": number, "confidence": "high" | "medium" | "low"}How to work out the numbers: system_kwp is chosen_panel_count times solarPotential.panelCapacityWatts divided by 1000, rounded to one decimal place. yearly_kwh is the yearlyEnergyDcKwh of the option you chose, rounded to a whole number. Never invent a number that is not in the JSON you were given. Set confidence to "low" if imageryQuality is not HIGH.Here is the building:{{BUILDING_INSIGHTS_JSON}}
Step 5Put the panels on the house
gemini-3-pro-image or gpt-image-2. Send the real photo with it.
Photorealistic edit of this real street photograph of a house at {{ADDRESS}}. Add a real rooftop solar photovoltaic array onto the roof slopes that face the camera.Use {{PANEL_COUNT}} standard all-black monocrystalline panels, each about {{PANEL_H}} m by {{PANEL_W}} m, laid in neat landscape rows flush and parallel to the existing roof pitch, mounted on low-profile black rails about 10 cm above the {{ROOF_MATERIAL}}, with a consistent gap from the ridge and from every roof edge, so no panel overhangs the eaves or the hips.The panels must follow the exact perspective, vanishing lines and pitch of the real roof planes in this photo. Give the panel glass a slightly reflective dark blue-black finish that picks up the same sky and the same light already in the photograph, and cast soft panel shadows onto the roof in the same direction as every other shadow in the scene. Leave a clear walkway strip around the chimney and do not cover the chimney, the skylights or the roof vents.Change nothing else at all. Keep the walls, the windows, the doors, the garden, the boundary wall, any parked vehicles, the sky, the exposure, the grain and the framing exactly as they are.The result must look like an unretouched photograph of a house that already has solar panels, not like a rendering or a diagram. No text, no labels, no watermarks, no arrows, no overlays.
Step 5Commercial version
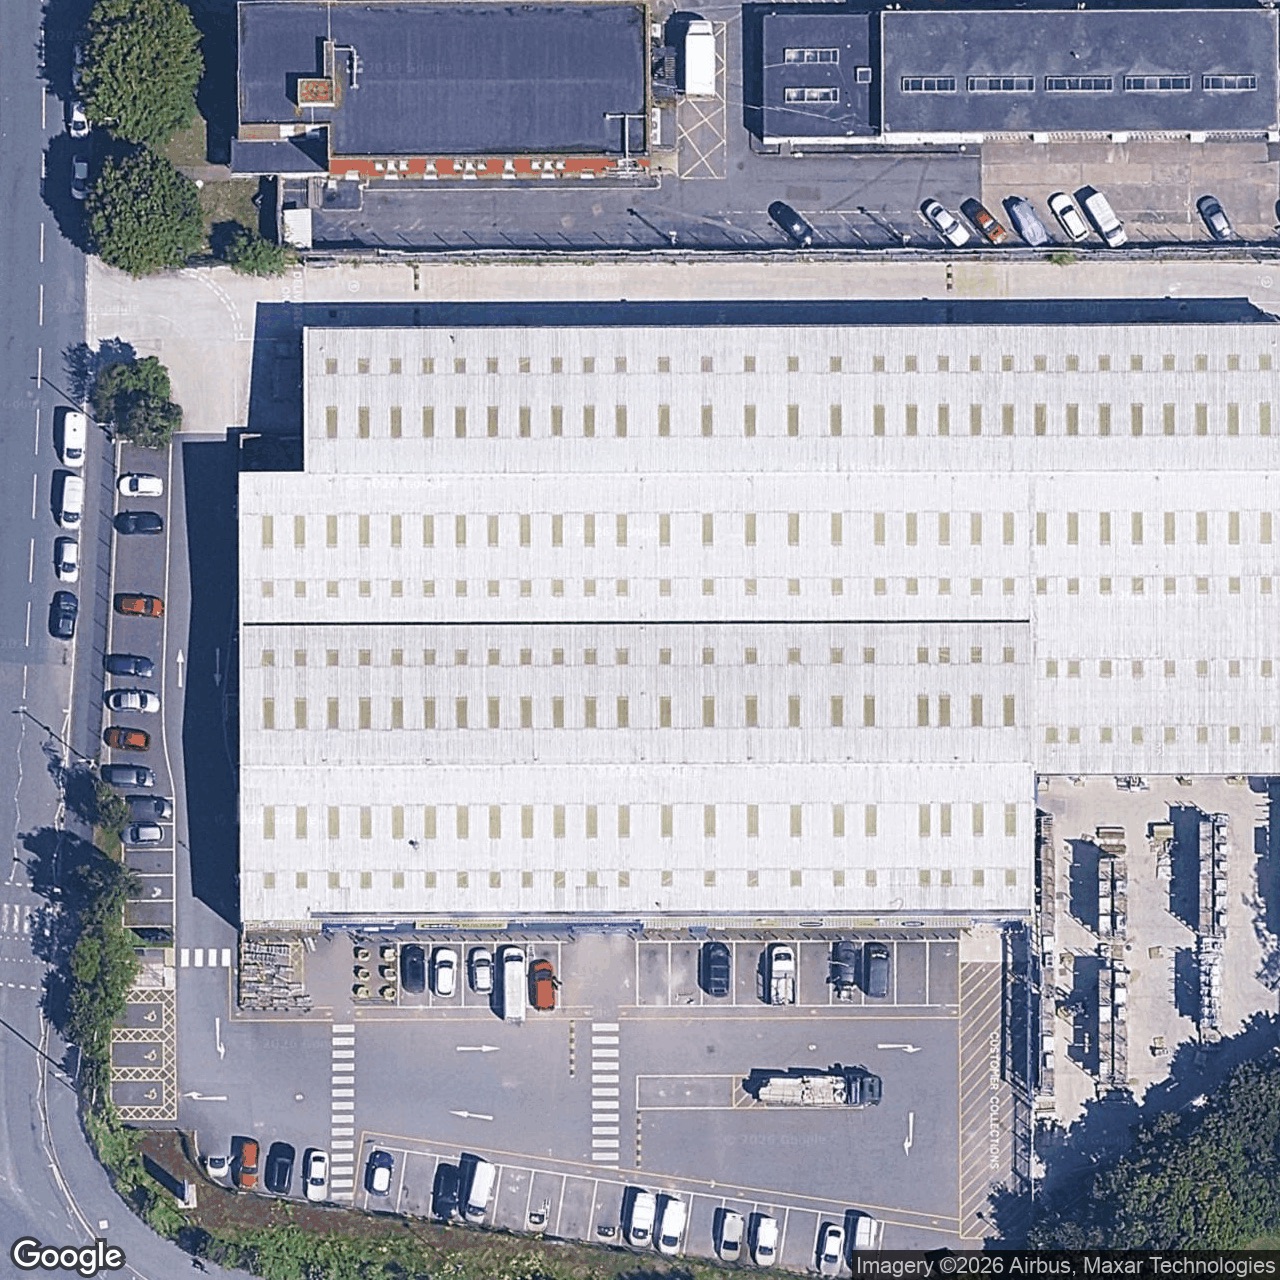
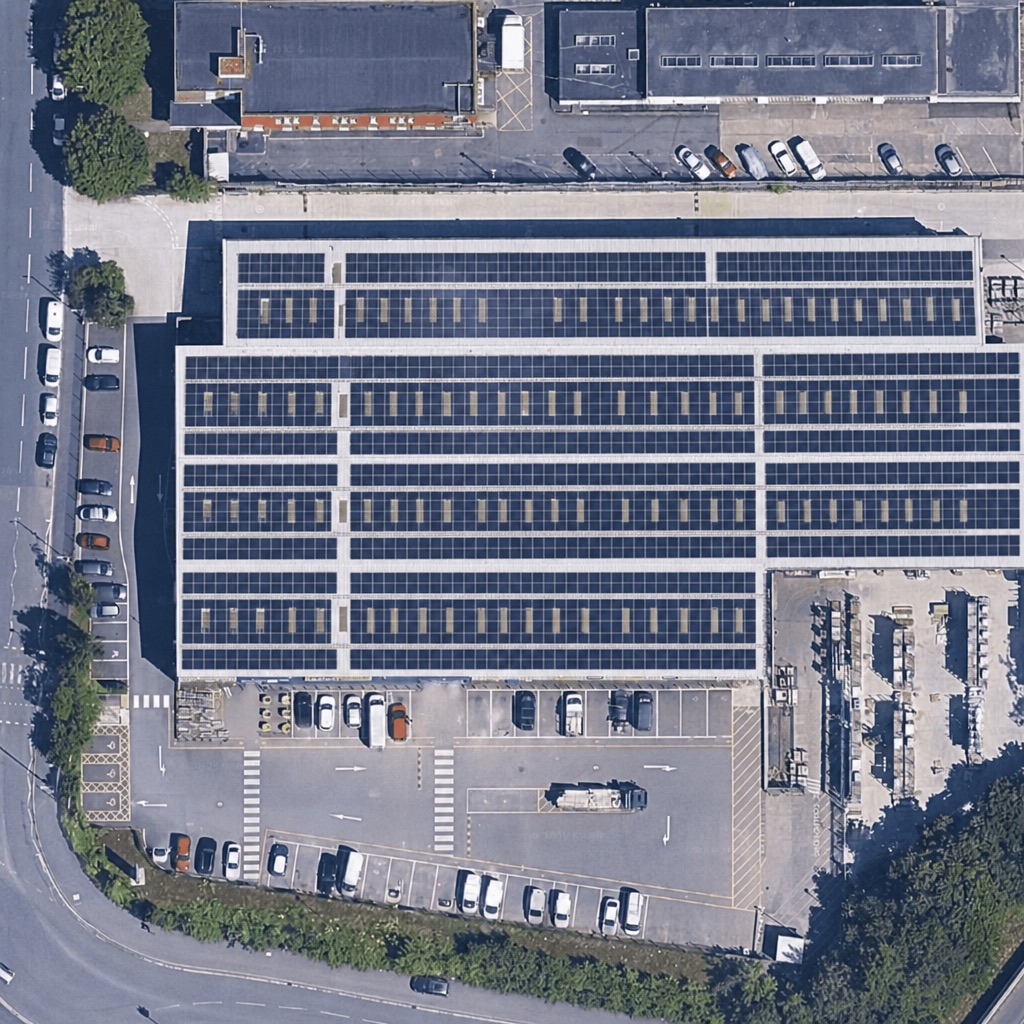
Send the satellite tile with it, not a street photo
Photorealistic edit of this real top down satellite image of {{BUSINESS_TYPE}} at {{ADDRESS}}. Cover the large {{ROOF_DESCRIPTION}} in the centre of the frame with a commercial rooftop solar photovoltaic array.Use dense rows of dark blue-black framed panels laid flat and flush with the existing roof bays, running parallel to the long axis of the building, in continuous blocks separated by clear walkway gangways about one metre wide every few rows, so a maintenance crew can walk the roof.Keep a clear perimeter setback of about one and a half metres from every roof edge and around every existing rooflight strip, vent and plant unit already visible on the roof. Do not cover {{EXCLUSIONS}}.Match the exact top down camera angle, the resolution, the satellite softness, the lighting and the colour balance of this image. Panels should read as a real installed array seen from a satellite, with subtle variation in reflection across the roof, not as a flat blue rectangle.Change nothing else in the frame. The car park, the parked vehicles, the delivery yard, any stacked materials, the trees, the roads and every neighbouring building stay exactly as they are.No text, no labels, no outlines, no highlight boxes, no arrows, no watermarks.
Filling in the braces, and the one that matters most
{{ROOF_MATERIAL}}· Look at the photo and write it. "tiles", "slate", "corrugated sheet".
{{BUSINESS_TYPE}}· "a large builders merchant warehouse", "a garden centre". Stops the model inventing a building.
{{ROOF_DESCRIPTION}}· What you can actually see: "white sawtooth warehouse roof". This is the substitution that most improves the picture.
{{EXCLUSIONS}}· The bits that must stay clear: "the entrance canopy along the bottom".
Never say "the south facing side"
The model has no idea which way is north. Describe the roof slope by where it is in the picture: "the slope facing the bottom of this image", "the left hand slope". Say "south facing" and it will guess, and it guesses wrong about half the time. This one mistake causes more bad pictures than everything else put together.
Step 8Write the message that goes with it
Any text model
Write the message that goes with a solar picture being sent to the owner of a specific building. The picture does the selling. Your job is the few lines around it that make opening it feel normal rather than strange.Facts you may use, and you may not use anything else:- address: {{ADDRESS}}- panels that fit: {{PANEL_COUNT}}- system size: {{SYSTEM_KWP}} kWp- estimated yearly production: {{YEARLY_KWH}} kWh- where the roof measurement came from: {{DATA_SOURCE}}- date of the aerial photo it was measured from: {{IMAGERY_DATE}}- who is sending it: {{SENDER_NAME}} at {{SENDER_COMPANY}}Rules:- Under 60 words.- All lowercase is fine and preferred. Plain everyday words.- No em dashes. Use full stops and commas.- Open by saying plainly what the picture is. Do not open with a greeting formula, a compliment, or a question about their energy bills.- State the production figure once. Never turn it into money, a saving, a percentage or a payback period.- Say where the roof measurement came from, in four words or fewer.- Say clearly and briefly that the picture is an illustration, not a design.- End with one easy question that can be answered in one word.- Do not use: unlock, transform, revolutionise, game changer, exciting, solution, reach out, touch base, circle back, I hope this finds you well, act now, limited time, exclusive, no obligation.- Do not claim you have visited the property, surveyed it, or been asked to look at it. Do not imply you already know them.Return only the message. If it is an email, return a JSON object with keys "subject" and "body", where the subject is under 50 characters and does not contain the words free, save, or offer.
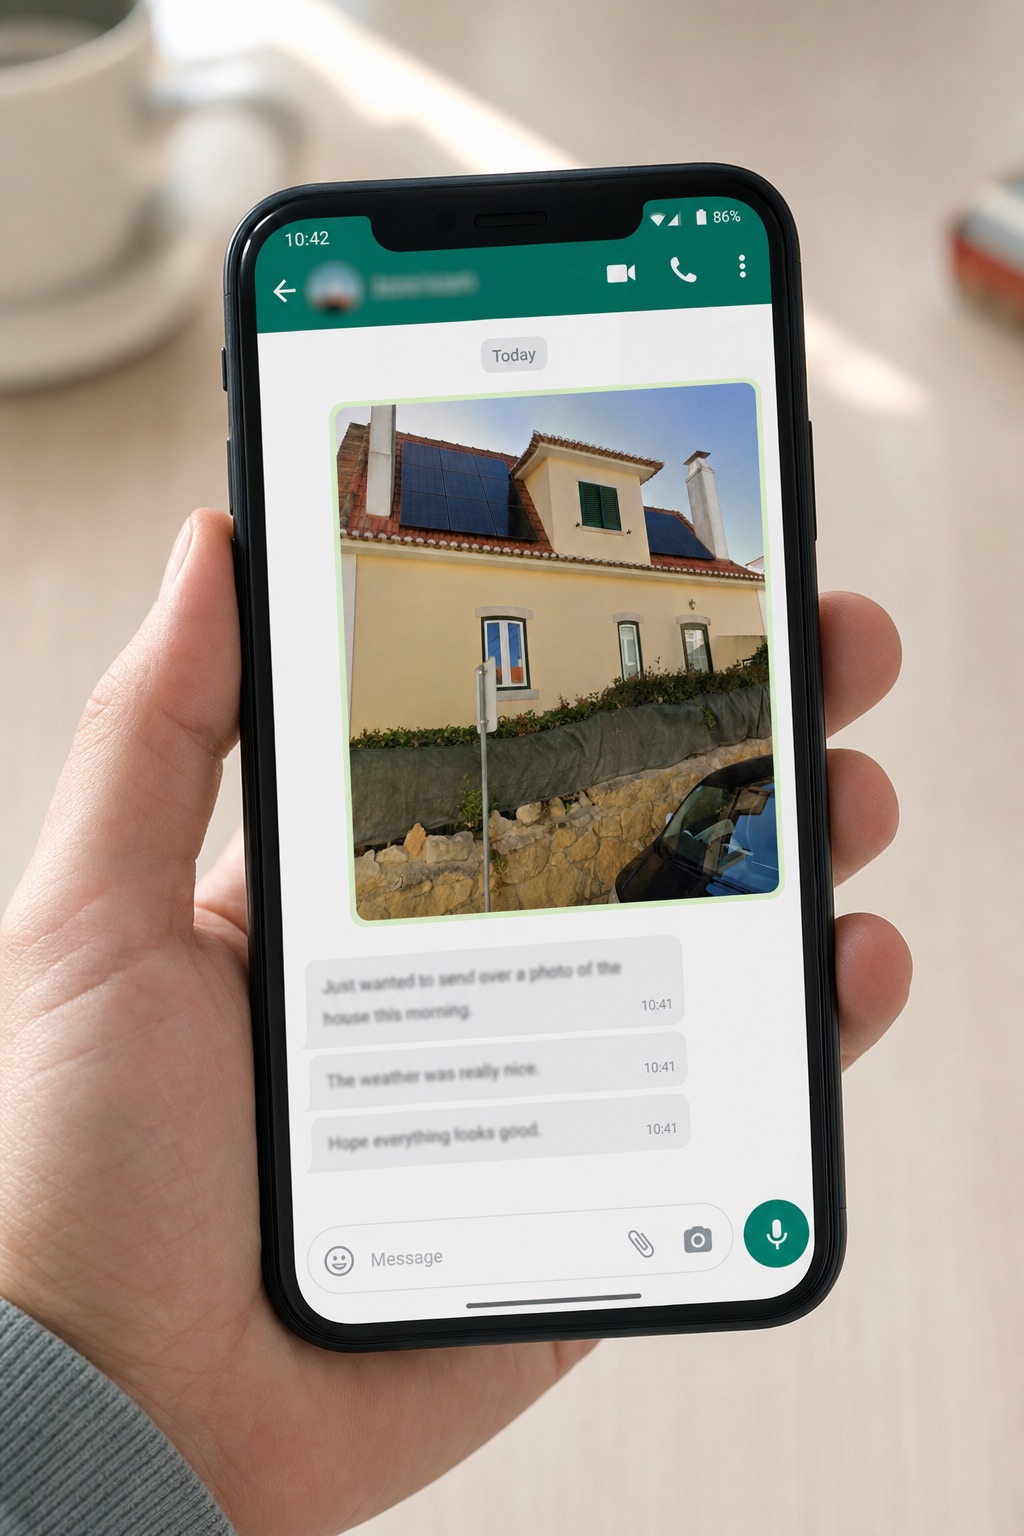
What that gives you for the Estoril house, on WhatsApp:
this is your roof at rua dr. antónio martins with panels on it. google's aerial survey says 24 panels fit, about 9.6 kWp, roughly 16,255 kWh a year. the picture is an illustration, not a design. worth a proper look?Forty three words. The picture does the work, so the words only have to make opening it feel normal. No greeting, no compliment, no question about their energy bills, and no money figure anywhere.
System 1.2Warehouse and commercial roof render
The same eight steps pointed at buildings with five thousand square metres of empty roof, and a company that owns it.
What it does, who pays, and what changes
Build this one first if you only build one. Warehouses are businesses, so Google lists them with a name, an address, a website and a phone number, which solves the contact problem that makes the houses version awkward. Their roofs are flat and empty, so the picture comes out better. And the arrays are twenty to a hundred times bigger, so one deal is worth a lot of houses.
Who pays you. A commercial solar installer, five to fifty people. What they do instead is bid on tenders, competing on price against strangers. Getting in front of an owner before a tender exists is worth more than any number of leads inside one.
Why it lands. Most business owners have no idea how much roof they have, so five thousand square metres is new information about their own property, and that is hard to ignore. The roof is also dead space that costs money and earns nothing.
The four things that change
| What | The change |
|---|---|
| Step 1 gets easy | Use the Places API text search instead of hunting addresses. One search per town gives you the building and the contact details. |
| Step 3 uses satellite, not Street View | The top down view is the only angle that shows how much roof there is. Zoom 19 for a small site, zoom 18 for a big one, always scale=2. |
| Step 2 thresholds go up | In the filter prompt: 800 m² of roof and 250 panels minimum, max pitch 15, and delete rule 4 entirely, because flat roof panels sit on tilted frames and face wherever you point them. Leaving that rule in throws away your best buildings. Present the count rounded down to the nearest 50. |
| Step 8 adds one sentence | They are open during the day, so most of what the roof makes gets used on site instead of exported cheaply. That one sentence is the commercial argument. |
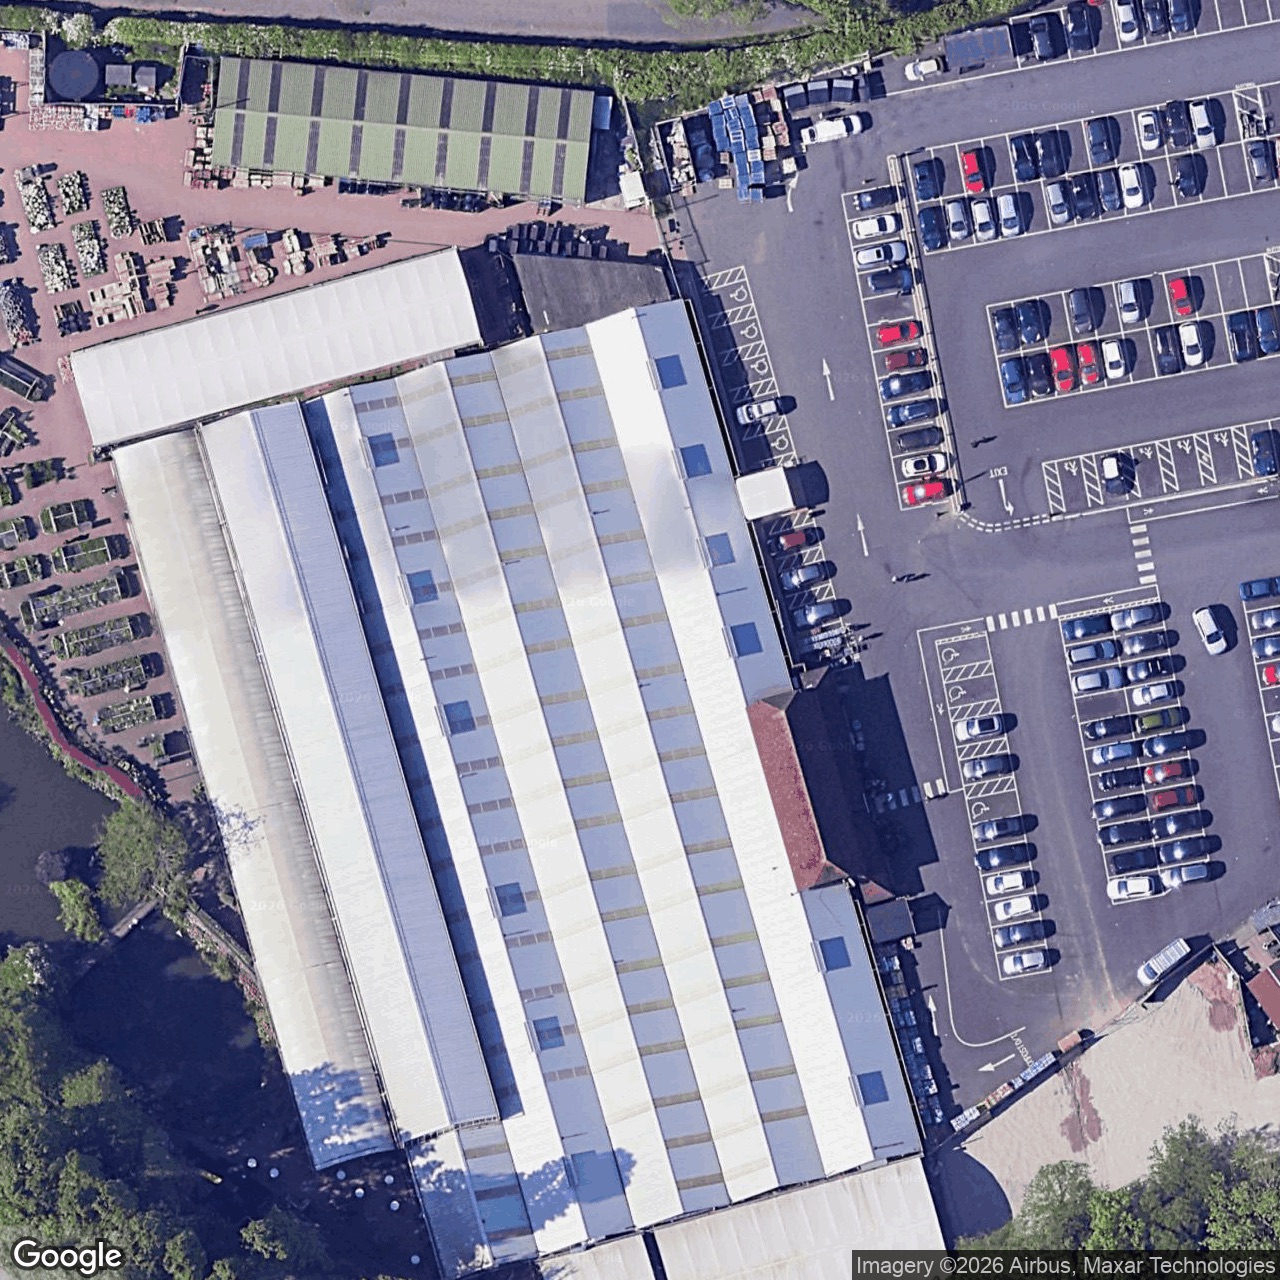
The searches that actually find big roofs
Do not search "warehouse". Search the kinds of business that sit in big single storey buildings and tend to own them, one town at a time:
Terminalcurl -X POST 'https://places.googleapis.com\/v1/places:searchText' \ -H 'Content-Type: application/json' \ -H "X-Goog-Api-Key: YOUR_KEY" \ -H 'X-Goog-FieldMask: places.id,\places.displayName,places.formattedAddress,\places.location' \ -d '{"textQuery":"builders merchant in Bristol", "pageSize":20}'Swap the search for:
garden centre·cold storage(the best, because refrigeration runs all day) ·furniture warehouse showroom·distribution centre·printing works·joinery.
Four of those searches across three English towns found, among others: Selco Bristol 5,073 m² / 2,362 panels, Longacres Ashford 6,111 m² / 2,129, JD Furniture Birmingham 6,354 m² / 2,528. Real answers. About a third of a good search is big enough to bother with.
What it looks like when it lands
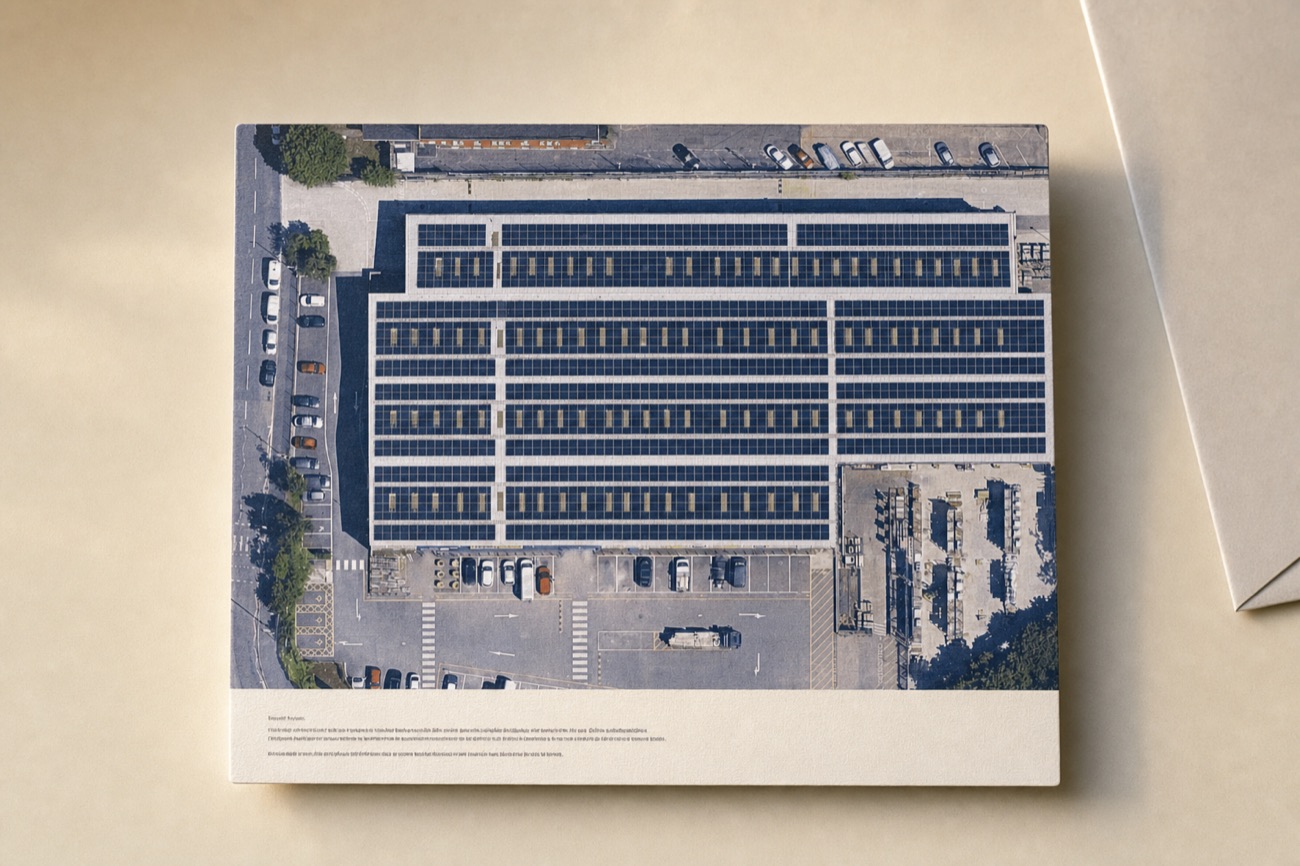
Real, end to end. Selco Builders Warehouse, Cater Road, Bishopsworth, Bristol BS13 7UH, found with the search above. 5,073 m² of bare roof, room for about 2,350 panels, roughly 940 kWp. Imagery dated 31 July 2024.
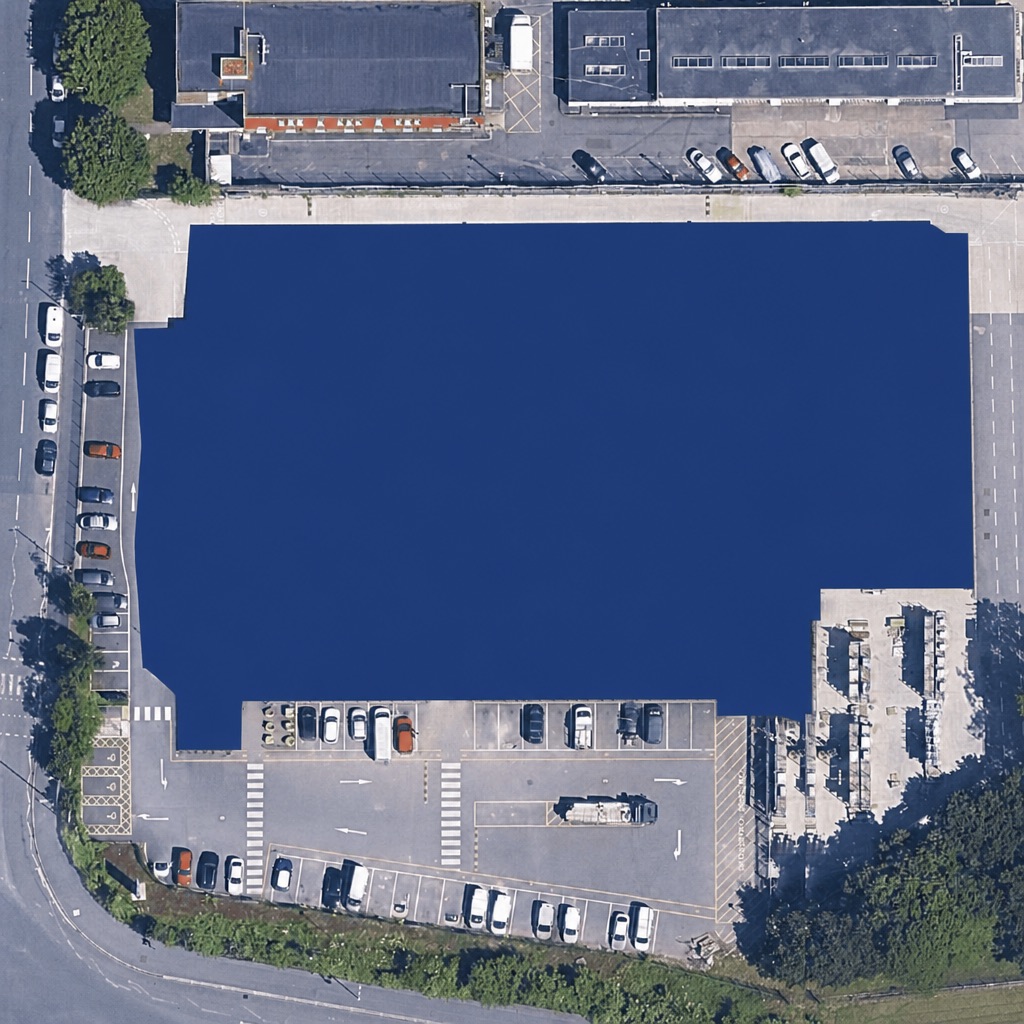
The two things you must check by eye, every time
Does the roof already have panels? Far more common on commercial than houses, and no API will tell you. Sending someone panels on a roof that already has them ends the relationship instantly. It is right there in the tile. Look.
Is it glass? Garden centres return huge roof areas and much of it is glasshouse, which cannot take panels. The API will happily say 2,129 panels fit. Again, look.
When you outgrow the spreadsheet
Only build this once doing it by hand hurts, which is usually when a client starts paying monthly. Until then a spreadsheet, a folder of pictures and your normal email account is genuinely the right answer. Skipping ahead to this page is the most common way people never send anything.
Three tables. Prospects is one row per building with its roof numbers. Assets is the before picture, the after picture and the message, with a status that starts at pending. Sends is one row every time something goes out. You do not have to write the SQL yourself: install the Supabase CLI and paste the prompt below into an AI coding tool.
Then one scheduled job, weekday mornings, so the queue is waiting for you when you start work rather than filling up while you sleep. OpenClaw is the easiest way to set it up, but a plain cron job calling a URL does the same thing. Three things to get right, and they are the only three:
- One job at a time. If two copies run at once you will send the same person two pictures.
- Retry three times, then stop. Wait a minute, then five, then twenty five, then park it and tell you. A job that retries forever quietly burns API calls on a broken key.
- The approval gate is one column, not a feature. The status on the asset starts at
pending, and the sending code only ever reads rows that sayapproved. Build it that way and no bug and no confused agent can ever send something you did not look at.
The three screens you need
Anything beyond these three is you avoiding the part where you send it.
all · queued · rendered · waiting · sent · dead
Sorted by roof size, biggest first. The biggest roof is always the call you make first.
One click on a row opens screen 2.
9.6 kWp · 24 panels · 16,255 kWh a year
imagery Dec 2024 · Google Solar API · HIGH
| when | who | channel | state |
|---|---|---|---|
| 09:04 | Selco Bristol | delivered | |
| 09:04 | Longacres Ashford | bounced | |
| 09:05 | Estoril villa | read | |
| 09:06 | Huws Gray Bristol | postcard | in transit |
| 09:06 | Cousins Birmingham | REPLIED |
This screen is the only proof the system works.
A bounce is a dead address, not a dead prospect. Fix the address and send it again.
One row per send, ever. Never overwrite one, or you lose the only record of what you actually said.
Set up the database
Paste into Claude Code, Cursor, or any AI coding tool, in your project folder
Set up Supabase for this project using the Supabase CLI, and write the SQL migration for me.First, if it is not already set up: install the CLI, run `supabase init`, then `supabase link` to my project, and tell me exactly what to paste when it asks for my project ref and database password.Then create a migration with three tables. Use uuid primary keys with gen_random_uuid() as the default, and give every table a created_at that defaults to now().TABLE 1, prospects. One row per building I am considering. - owner_id, text, not null. This is my Clerk user id. - system, text, not null. Either 'residential' or 'commercial'. - name, text, nullable. The business name. Null for a house. - address, text, not null. lat and lng, both float8, not null. - place_id, text, unique, nullable. The Google Places id. Null for a house. - roof_area_m2, panel_count, system_kwp, yearly_kwh. The numbers from the Google Solar API. - imagery_date, date. When the aerial photo the measurement came from was taken. - raw, jsonb. The entire Solar API response, kept as is. Never throw this away. - status, text, not null, default 'new'.TABLE 2, assets. One row per picture I make for a prospect. - prospect_id, references prospects, and delete it if the prospect is deleted. - before_url and render_url, text. Where the two pictures live in storage. - subject and body, text. The message that goes with it. - model, text, and prompt, text. Which image model made it and the exact prompt used, so that when the pictures get worse in three months I can prove what changed. - status, text, not null, default 'pending'. Only ever 'pending', 'approved' or 'rejected'.TABLE 3, sends. One row every single time something goes out. Never updated, only inserted. - asset_id, references assets, and delete it if the asset is deleted. - channel, text. One of 'email', 'whatsapp', 'postcard'. - to_address, text, not null. provider_id, text, the id the provider gives back. - status, text, not null, default 'queued'. sent_at, timestamptz, nullable.Now the security, and this part matters most. Turn on row level security on all three tables, then write policies so I can only ever see and change my own rows. prospects has owner_id on it directly, so compare that against the Clerk user id, which Supabase exposes as auth.jwt() ->> 'sub'. assets and sends have no owner column of their own, so their policies have to join back up to prospects to work out who the row belongs to.Also create a private storage bucket called 'assets' for the pictures, with a policy that only lets me read files inside a folder named after my own user id.Finally, add the indexes that actually matter for how I will use this. I will be listing prospects by owner and status, sorting them by roof area, looking up assets that are still pending, and looking up sends by the provider id when a delivery webhook comes back.Explain in plain English what each policy does before you write it, run the migration with `supabase db push`, then show me one test query proving a second user cannot read my rows.
Charging, going live, and the rest of the world
The two ways to charge
Run it yourself. You keep the code and the keys, and everything goes out branded as the client, from their domain, with their name on it. The homeowner never learns you exist, which is the point: they are being contacted by a solar installer about their roof, which is normal, rather than by an agency, which is not. You bill monthly on the leads or the booked appointments.
Or hand it over. You build it in their accounts, teach someone to press approve, and charge a setup fee plus a monthly. The monthly is not optional: this leans on four outside services and one of them changes every few months.
Which fits this? Run it yourself. Someone has to look at every picture and judge whether it is believable, and that takes taste you only get from seeing a few hundred. An installer handed this approves everything on the first morning, sends a picture of a roof that already has panels, and decides the system does not work.
With a first client, sell a pilot, not a monthly
One town, an agreed number of pictures, two weeks, fixed fee. You do not know your reply rate in their market yet and neither do they, so a monthly agreed up front is a guess by both of you. At the end you both have real numbers and you price off something measured. Clients say yes to this far more easily.
Before you send the first one
- The Google key is restricted to the five APIs, and there is a budget alert on the project
- You ran the Solar API on your own home and the answer looked right
- You have made at least twenty pictures and looked at every one, so you know what a bad one looks like before a stranger does
- Your sending domain has SPF, DKIM and DMARC set up and tested
- The picture says "illustration, not a design" and where the measurement came from
- A reply lands in an inbox somebody actually reads
What breaks
The roof already has panels. The most embarrassing one, and no API warns you. You catch it by looking at the tile. Forever.
The pictures quietly get worse. Image models change under you without warning. Save the exact prompt and model with every picture so you can prove what changed, then retune the prompt.
The Places pin is not the building. It lands on the entrance or the car park. Recentre on the building position the Solar API gives you before pulling any image.
What I have not tested
Everything up to and including the picture was run against the live APIs on the two real buildings in here. I have not sent a real one to a real prospect, stood up the dashboard, or run the scheduled job. Those come from current documentation. And I have no measured reply rate for this, in any country. Anyone who gives you one is guessing. Run the pilot and measure your own.
If you are not in Europe or North America
Google's Solar API covers over 472 million buildings in 40+ countries. An experimental setting adds ~150 million more, including Brazil, Colombia and Peru, by adding
&requiredQuality=BASE&experiments=EXPANDED_COVERAGEto the call. Outside that it returns 404, which is an answer, not an error.When it does, get the roof outline free from OpenStreetMap at
overpass-api.de, estimate panels at roof area ÷ 1.96 m² then take 70%, and get the yearly kWh free from PVGIS, which needs no account at all.And change the channel. In Brazil, Mexico, most of Latin America, India, Indonesia, Nigeria, Kenya and South Africa, WhatsApp is the business channel, not an alternative to email. Marketing there needs an opt in, so use it as the reply channel after a first contact elsewhere.